Caliburn.Micro Xaml made easy
Basic Configuration, Actions and Conventions
Starting a project:
-
Open Visual Studio
-
Create a new WPF Application called “Caliburn.Micro.Hello”
-
Add a reference to the Caliburn.Micro Nuget package. You can find it on
.
-
Delete “MainWindow.xaml” and remove the
StartupUrifrom your “App.xaml” so that it looks like this:
<Application x:Class="Caliburn.Micro.Hello.App"
             xmlns="http://schemas.microsoft.com/winfx/2006/xaml/presentation"
             xmlns:x="http://schemas.microsoft.com/winfx/2006/xaml"
             xmlns:local="clr-namespace:Caliburn.Micro.Hello">
    <Application.Resources>

    </Application.Resources>
</Application>
Since Caliburn.Micro prefers a ViewModel-First approach, let’s start there.
-
Create your first ViewModel, create a new class and call it “ShellViewModel”.
-
Open your ShellViewModel.cs and use the following code for the implementation:
using System.Windows;

namespace Caliburn.Micro.Hello.ViewModels
{
    public class ShellViewModel : PropertyChangedBase
    {
        string name;

        public string Name
        {
            get { return name; }
            set
            {
                name = value;
                NotifyOfPropertyChange(() => Name);
                NotifyOfPropertyChange(() => CanSayHello);
            }
        }

        public bool CanSayHello
        {
            get { return !string.IsNullOrWhiteSpace(Name); }
        }

        public void SayHello()
        {
            MessageBox.Show(string.Format("Hello {0}!", Name)); //Don't do this in real life :)
        }
    }
Notice that the ShellViewModel inherits from PropertyChangedBase. This is a base class that implements the infrastructure for property change notification and automatically performs UI thread marshalling. It will come in handy :)
Now that we have our ViewModel, let’s create the bootstrapper. The Bootstrapper will configure the framework and tell it what to do.
- Create a new class named “HelloBootstrapper”. You can use this tiny bit of code:
namespace Caliburn.Micro.Hello {
    public class HelloBootstrapper : BootstrapperBase {
        public HelloBootstrapper() {
            Initialize();
        }

        protected override void OnStartup(object sender, StartupEventArgs e) {
            DisplayRootViewFor<ShellViewModel>();
        }
    }
}
The Bootsrapper allows you to specify the type of root view model using DisplayRootViewFor<TViewModel>(). The “root view model” is a ViewModel that Caliburn.Micro will instantiate and use to show your application.
Next, we need to implement the “HelloBootstrapper” so it will run at startup.
- To do that, update your App.xaml to add the bootstrapper to your resources, like this:
WPF
<Application xmlns="http://schemas.microsoft.com/winfx/2006/xaml/presentation"
             xmlns:x="http://schemas.microsoft.com/winfx/2006/xaml"
             xmlns:local="clr-namespace:Caliburn.Micro.Hello"
             x:Class="Caliburn.Micro.Hello.App">
    <Application.Resources>
        <ResourceDictionary>
            <ResourceDictionary.MergedDictionaries>
                <ResourceDictionary>
                    <local:HelloBootstrapper x:Key="bootstrapper" />
                </ResourceDictionary>
            </ResourceDictionary.MergedDictionaries>
        </ResourceDictionary>
    </Application.Resources>
</Application>
All we have to do is place a Caliburn.Micro bootstrapper in the Application.Resources and it will do the rest of the work. Now, run the application. You should see something like this:

Caliburn.Micro creates the ShellViewModel, but doesn’t know how to render it without a view. So, let’s create a view for it to find.
- Create a new User Control (WPF) named “ShellView”. Use the following xaml:
<UserControl x:Class="Caliburn.Micro.Hello.ShellView"
             xmlns="http://schemas.microsoft.com/winfx/2006/xaml/presentation"
             xmlns:x="http://schemas.microsoft.com/winfx/2006/xaml"
             Height="450" Width="800">
    <StackPanel>
        <Label Content="Hello please write your name" />
        <TextBox x:Name="Name" />
        <Button x:Name="SayHello"
                Content="Click Me" />
    </StackPanel>
</UserControl>
Run the application again. You should now see the UI:
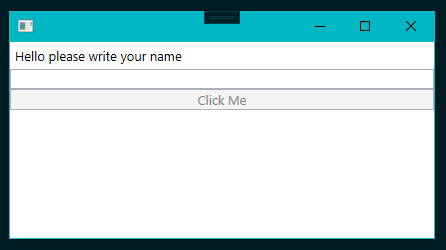
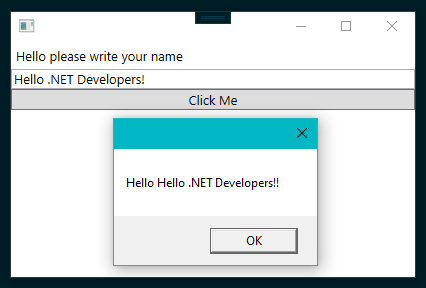
Typing something in the TextBox will enable the Button and clicking it will show a message:
How it works
Caliburn.Micro uses a simple naming convention to locate Views for ViewModels. Essentially, it takes the FullName and removes “Model” from it.
So, given:
MyApp.ViewModels.MyViewModel
It would look for:
MyApp.Views.MyView
Looking at the View and ViewModel side-by-side, you can see that the TextBox with x:Name=”Name” is bound to the “Name” property on the ViewModel. You can also see that the Button with x:Name=”SayHello” is bound to the method with the same name on the ViewMModel. The CanSayHello property is guarding access to the SayHello action by disabling the Button. These are the basics of Caliburn.Micro’s ActionMessage and Conventions functionality.
There’s much more to show. Next, we can integrate an IoC container such as MEF.