Caliburn.Micro Xaml made easy
The CategoryView
Create the CategoryView
Introduction
The last coding step is to create the CategoryView. Make sure to do it in the Views folder, otherwise it will not work. First let’s introduce the code and then the important details will be discussed. In the code there is a lot of stuff that is not really relevant, but necessary to make it look not to bad.
<UserControl x:Class="Caliburn.Micro.Tutorial.Wpf.Views.CategoryView"
             xmlns="http://schemas.microsoft.com/winfx/2006/xaml/presentation"
             xmlns:d="http://schemas.microsoft.com/expression/blend/2008"
             xmlns:x="http://schemas.microsoft.com/winfx/2006/xaml"
             xmlns:mc="http://schemas.openxmlformats.org/markup-compatibility/2006"
             mc:Ignorable="d"
             d:DesignHeight="450" d:DesignWidth="800">
  <Grid>
    <Grid.ColumnDefinitions>
      <ColumnDefinition Width="auto"/>
      <ColumnDefinition Width="auto"/>
      <ColumnDefinition Width="auto"/>
      <ColumnDefinition Width="*"/>
    </Grid.ColumnDefinitions>
    <StackPanel Grid.Column="0">
      <TextBlock HorizontalAlignment="Center" FontSize="20" FontWeight="Bold" Margin="10">Categories</TextBlock>
      <DataGrid ItemsSource="{Binding CategoryList, NotifyOnSourceUpdated=True}"
                             SelectedItem="{Binding SelectedCategory}"
                             AutoGenerateColumns="False" Height="200" Margin="10">
        <DataGrid.Columns>
          <DataGridTextColumn Header="Name" Binding="{Binding CategoryName}" Width="80"/>
          <DataGridTextColumn Header="Description" Binding="{Binding CategoryDescription}" Width="200"/>
        </DataGrid.Columns>
      </DataGrid>
      <WrapPanel>
        <Button x:Name="Edit" Width="80" Margin="5">Edit</Button>
        <Button x:Name="Delete" Width="80" Margin="5">Delete</Button>
      </WrapPanel>
    </StackPanel>
    <StackPanel Grid.Column="1">
      <TextBlock HorizontalAlignment="Center" FontSize="20" FontWeight="Bold" Margin="10">Edit Category</TextBlock>
      <WrapPanel Margin="5">
        <TextBlock Width="120">Category Name</TextBlock>
        <TextBox x:Name="CategoryName" Text="{Binding CategoryName, Mode=TwoWay}" Width="80"/>
      </WrapPanel>
      <WrapPanel Margin="5">
        <TextBlock Width="120">Category Description</TextBlock>
        <TextBox x:Name="CategoryDescription" Text="{Binding CategoryDescription, Mode=TwoWay}" Width="160"/>
      </WrapPanel>
      <WrapPanel>
        <Button x:Name="Save" Width="80" Margin="5">Save</Button>
        <Button x:Name="Clear" Width="80" Margin="5">Clear</Button>
      </WrapPanel>
    </StackPanel>
  </Grid>
</UserControl>
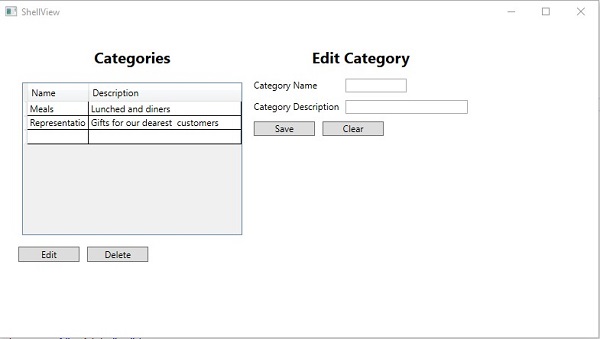
The user control as specified above looks like this, when embedded in the Shell:
The DataGrid
The DataGrid looks very familiar You see two variables in the CategoryViewModel are bound here. The CategoryList and the SelectedCategory. With Caliburn.Micro we use far less eventhandlers in the XAML code than we do for the non-MVVM approach.
<DataGrid ItemsSource="{Binding CategoryList, NotifyOnSourceUpdated=True}"
          SelectedItem="{Binding SelectedCategory}"
TextBoxes
For a TextBox you can use the Caliburn.Micro naming conventions. If you give the TextBox the same name as a property in the ViewModel, it will automatically bind to this property. In this case, this feature is not used. The reason is that we like to fill the contents of the TextBox from the CategoryViewModel with an initial value. This makes that you need to specify Mode=TwoWay in the binding expression. For other reasons, this naming convention is still needed, so we do both here.
<TextBox x:Name="CategoryName" Text="{Binding CategoryName, Mode=TwoWay}" Width="80"/>
Buttons
An example of the XAML code for a Button is shown below:
<Button x:Name="Edit" Width="80" Margin="5">Edit</Button>
What is clearly “missing” here is the OnClick event handler. Caliburn.Micro will try to match the name x:Name="Edit" with a method name in the corresponding view. Note that the DebugLog will tell you if it can find a suitable method. This is all you really need to hook a button to the ViewModel.
There are frameworks that do not use this magic. In the cases I have seen they use the ICommand interface. You need to add a command both in the XAML code and in the ViewModel code. This is a lot more work to do and this is the Caliburn.Micro feature I can really appreciate. If you introduce a bug, it can be a bit hard to find out what you do wrong. Later some issues will be discussed. It is not always as simple as in this case. A more detailed explanation can be found here.
Conclusion
You now can compile and run the code for this simple example. Also, to make it an operational and well maintainable program, you still need to do some work. For instance, you should not use hard coded margins and font sizes. That is beyond the scope of this tutorial.