Caliburn.Micro Xaml made easy
All About Actions
We briefly introduced actions in Pt. 1, but there is so much more to know. To begin our investigation, we’ll take our simple “Hello” example and see what it looks like when we explicitly create the actions rather than use conventions. Here’s the Xaml:
<UserControl x:Class="Caliburn.Micro.Hello.ShellView"
             xmlns="http://schemas.microsoft.com/winfx/2006/xaml/presentation"
             xmlns:x="http://schemas.microsoft.com/winfx/2006/xaml"
             xmlns:i="http://schemas.microsoft.com/xaml/behaviors"
             xmlns:cal="http://www.caliburnproject.org">
    <StackPanel>
        <Label Content="Hello please write your name" />
        <TextBox x:Name="Name" />
        <Button Content="Click Me">
            <i:Interaction.Triggers>
                <i:EventTrigger EventName="Click">
                    <cal:ActionMessage MethodName="SayHello" />
                </i:EventTrigger>
            </i:Interaction.Triggers>
        </Button>
    </StackPanel>
</UserControl>
As you can see, the Actions feature leverages Microsoft.Xaml.Behaviors for it’s trigger mechanism. This means that you can use anything that inherits from Microsoft.Xaml.Behaviors.TriggerBase to trigger the sending of an ActionMessage.
1 Perhaps the most common trigger is an EventTrigger, but you can create almost any kind of trigger imaginable or leverage some common triggers already created by the community. ActionMessage is, of course, the Caliburn.Micro-specific part of this markup. It indicates that when the trigger occurs, we should send a message of “SayHello.” So, why do I use the language “send a message” instead of “execute a method” when describing this functionality? That’s the interesting and powerful part. ActionMessage bubbles through the Visual Tree searching for a target instance that can handle it. If a target is found, but does not have a “SayHello” method, the framework will continue to bubble until it finds one, throwing an exception if no “handler” is found.
2 This bubbling nature of ActionMessage comes in handy in a number of interesting scenarios, Master/Details being a key use case. Another important feature to note is Action guards. When a handler is found for the “SayHello” message, it will check to see if that class also has either a property or a method named “CanSayHello.” If you have a guard property and your class implements INotifyPropertyChanged, then the framework will observe changes in that property and re-evaluate the guard accordingly. We’ll discuss method guards in further detail below.
Action Targets
Now you’re probably wondering how to specify the target of an ActionMessage. Looking at the markup above, there’s no visible indication of what that target will be. So, where does that come from? Since we used a Model-First approach, when Caliburn.Micro (hereafter CM) created the view and bound it to the ViewModel using the ViewModelBinder, it set this up for us. Anything that goes through the ViewModelBinder will have its action target set automatically. But, you can set it yourself as well, using the attached property Action.Target. Setting this property positions an ActionMessage “handler” in the Visual Tree attached to the node on with you declare the property. It also sets the DataContext to the same value, since you often want these two things to be the same. However, you can vary the Action.Target from the DataContext if you like. Simply use the Action.TargetWithoutContext attached property instead. One nice thing about Action.Target is that you can set it to a System.String and CM will use that string to resolve an instance from the IoC container using the provided value as its key. This gives you a nice way of doing View-First MVVM if you so desire. If you want Action.Target set and you want Action/Binding Conventions applied as well, you can use the Bind.Model attached property in the same way.
View First
//Skip this section.
Let’s see how we would apply this to achieve MVVM using a View-First technique (gasp!) Here’s how we would change our bootstrapper:
public class MefBootstrapper : BootstrapperBase
{
    //same as before

    protected override void OnStartup(object sender, StartupEventArgs e)
    {
        Application.RootVisual = new ShellView();
    }

    //same as before
}
Because we are using View-First, we’ve inherited from the non-generic Bootstrapper. The MEF configuration is the same as seen previously, so I have left that out for brevity’s sake. The only other thing that is changed is how the view gets created. In this scenario, we simply override OnStartup, instantiate the view ourselves and set it as the RootVisual (or call Show in the case of WPF). Next, we’ll slightly alter how we are exporting our ShellViewModel, by adding an explicitly named contract:
[Export("Shell", typeof(IShell))]
public class ShellViewModel : PropertyChangedBase, IShell
{
    //same as before
}
Finally, we will alter our view to pull in the VM and perform all bindings:
<UserControl x:Class="Caliburn.Micro.ViewFirst.ShellView"
             xmlns="http://schemas.microsoft.com/winfx/2006/xaml/presentation"
             xmlns:x="http://schemas.microsoft.com/winfx/2006/xaml"
             xmlns:cal="http://www.caliburnproject.org"
             cal:Bind.Model="Shell">
    <StackPanel>
        <TextBox x:Name="Name" />
        <Button x:Name="SayHello"
                Content="Click Me" />
    </StackPanel>
</UserControl>
Notice the use of the Bind.Model attached property. This resolves our VM by key from the IoC container, sets the Action.Target and DataContext and applies all conventions. I thought it would be nice to show how View-First development is fully supported with CM, but mainly I want to make clear the various ways that you can set targets for actions and the implications of using each technique. Here’s a summary of the available attached properties:
- Action.Target
- Sets both the Action.Target property and the DataContext property to the specified instance. String values are used to resolve an instance from the IoC container.
- Action.TargetWithoutContext
- Sets only the Action.Target property to the specified instance. String values are used to resolve an instance from the IoC container.
- Bind.Model
- View-First - Set’s the Action.Target and DataContext properties to the specified instance. Applies conventions to the view. String values are used to resolve an instance from the IoC container. (Use on root nodes like Window/UserControl/Page.)
- Bind.ModelWithoutContext
- View-First - Set’s the Action.Target to the specified instance. Applies conventions to the view. (Use inside of DataTemplate.)
- View.Model
- ViewModel-First – Locates the view for the specified VM instance and injects it at the content site. Sets the VM to the Action.Target and the DataContext. Applies conventions to the view.
Action Parameters
Now, let’s take a look at another interesting aspect of ActionMessage: Parameters. To see this in action, let’s switch back to our original ViewModel-First bootstrapper, etc. and begin by changing our ShellViewModel to look like this:
using System.Windows;

public class ShellViewModel : IShell
{
    public bool CanSayHello(string name)
    {
        return !string.IsNullOrWhiteSpace(name);
    }

    public void SayHello(string name)
    {
        MessageBox.Show(string.Format("Hello {0}!", name));
    }
}
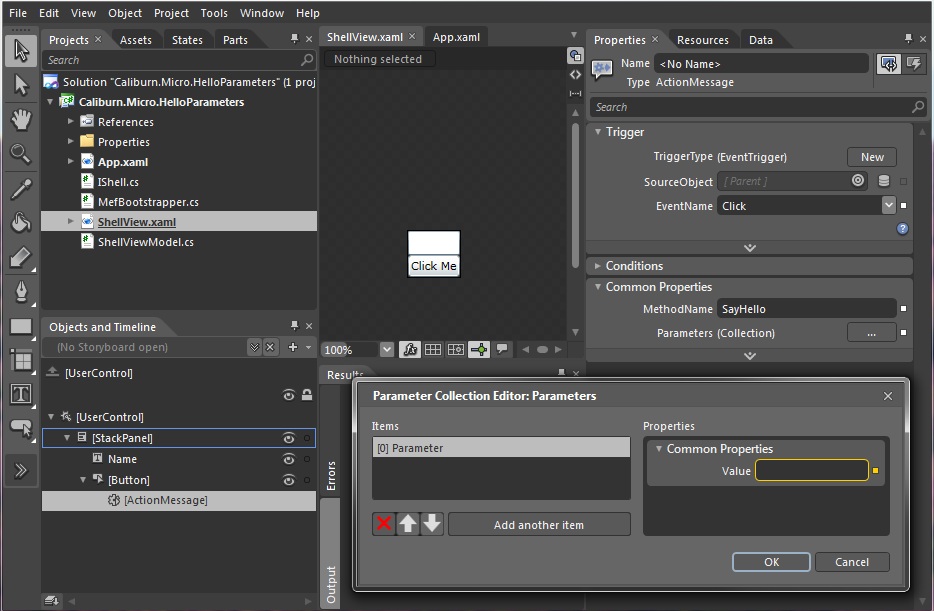
There are a few things to note here. First, we are now working with a completely POCO class; no INPC goop here. Second, we have added an input parameter to our SayHello method. Finally, we changed our CanSayHello property into a method with the same inputs as the action, but with a bool return type. Now, let’s have a look at the Xaml:
<UserControl x:Class="Caliburn.Micro.HelloParameters.ShellView"
             xmlns="http://schemas.microsoft.com/winfx/2006/xaml/presentation"
             xmlns:x="http://schemas.microsoft.com/winfx/2006/xaml"
             xmlns:i="http://schemas.microsoft.com/xaml/behaviors"
             xmlns:cal="http://www.caliburnproject.org">
    <StackPanel>
        <TextBox x:Name="Name" />
        <Button Content="Click Me">
            <i:Interaction.Triggers>
                <i:EventTrigger EventName="Click">
                    <cal:ActionMessage MethodName="SayHello">
                        <cal:Parameter Value="{Binding ElementName=Name, Path=Text}" />
                    </cal:ActionMessage>
                </i:EventTrigger>
            </i:Interaction.Triggers>
        </Button>
    </StackPanel>
</UserControl>
Our markup now has one modification: We declared the parameter as part of the ActionMessage using an ElementName Binding. You can have any number of parameters you desire. Value is a DependencyProperty, so all the standard binding capabilities apply to parameters. Did I mention you can do all this in Blend?
One thing that is nice about this is that every time the value of a parameter changes, we’ll call the guard method associated with the action(CanSayHello in this case) and use its result to update the UI that the ActionMessage is attached to. Go ahead and run the application. You’ll see that it behaves the same as in previous examples.
In addition to literal values and Binding Expressions, there are a number of helpful “special” values that you can use with parameters. These allow you a convenient way to access common contextual information:
- $eventArgs
- Passes the EventArgs or input parameter to your Action. Note: This will be null for guard methods since the trigger hasn’t actually occurred.
- $dataContext
- Passes the DataContext of the element that the ActionMessage is attached to. This is very useful in Master/Detail scenarios where the ActionMessage may bubble to a parent VM but needs to carry with it the child instance to be acted upon.
- $source
- The actual FrameworkElement that triggered the ActionMessage to be sent.
- $view
- The view (usually a UserControl or Window) that is bound to the ViewModel.
- $executionContext
- The action's execution context, which contains all the above information and more. This is useful in advanced scenarios.
- $this
- The actual UI element to which the action is attached. In this case, the element itself won't be passed as a parameter, but rather its default property.
You must start the variable with a “$” but the name is treated in a case-insensitive way by CM. These can be extended through adding values to MessageBinder.SpecialValues.
Note: Using Special Values like $this or a Named Element
When you don’t specify a property, CM uses a default one, which is specified by the particular control convention. For button, that property happens to be “DataContext”, while a TextBox defaults to Text, a Selector to SelectedItem, etc. The same happens when using a reference to another named control in the View instead of $this. The following: causes CM to pass the Text contained in the TextBox named “someTextBox” to MyAction. The reason why the actual control is never passed to the action is that VMs should never directly deal with UI elements, so the convention discourages it. Note, however, that the control itself could easily be accessed anyway using the extended syntax (based on System.Windows.Interactivity) to populate the parameters, or customizing the Parser.
Enum values
If you want to pass Enum values as a parameter, you need to pass the value as an (uppercase) string:
...
<Fluent:Button Header="Go!" cal:Message.Attach="[Event Click] = [Action MethodWithEnum('MONKEY')]" />
public enum Animals
{
  Unicorn,
  Monkey,
  Dog
}

public class MyViewModel
{
    public void MethodWithEnum(Animals a)
    {
         Animals myAnimal = a;
    }
}
Xamarin Forms
For Xamarin Forms only the $this parameter works, this is because traversing the visual tree is a bit different in Xamarin Forms.
Word to the Wise
Parameters are a convenience feature. They are very powerful and can help you out of some tricky spots, but they can be easily abused. Personally, I only use parameters in the simplest scenarios. One place where they have worked nicely for me is in login forms. Another scenario, as mentioned previously is Master/Detail operations.
Now, do you want to see something truly wicked? Change your Xaml back to this:
<UserControl x:Class="Caliburn.Micro.HelloParameters.ShellView"
             xmlns="http://schemas.microsoft.com/winfx/2006/xaml/presentation"
             xmlns:x="http://schemas.microsoft.com/winfx/2006/xaml">
    <StackPanel>
        <TextBox x:Name="Name" />
        <Button x:Name="SayHello"
                Content="Click Me" />
    </StackPanel>
</UserControl>
Running the application will confirm for you that CM’s conventions even understand ActionMessage parameters. We’ll discuss conventions a lot more in the future, but you should be happy to know that these conventions are case-insensitive and can even detect the before-mentioned “special” values.
Action Bubbling
Now, lets look at a simple Master/Detail scenario that demonstrates ActionMessage bubbling, but let’s do it with a shorthand syntax that is designed to be more developer friendly. We’ll start by adding a simple new class named Model:
using System;

public class Model
{
    public Guid Id { get; set; }
}
And then we’ll change our ShellViewModel to this:
using System;
using System.ComponentModel.Composition;

[Export(typeof(IShell))]
public class ShellViewModel : IShell
{
    public BindableCollection<Model> Items { get; private set; }

    public ShellViewModel()
    {
        Items = new BindableCollection<Model>{
            new Model { Id = Guid.NewGuid() },
            new Model { Id = Guid.NewGuid() },
            new Model { Id = Guid.NewGuid() },
            new Model { Id = Guid.NewGuid() }
        };
    }

    public void Add()
    {
        Items.Add(new Model { Id = Guid.NewGuid() });
    }

    public void Remove(Model child)
    {
        Items.Remove(child);
    }
}
Now our shell has a collection of Model instances along with the ability to add or remove from the collection. Notice that the Remove method takes a single parameter of type Model. Now, let’s update the ShellView:
<UserControl x:Class="Caliburn.Micro.BubblingAction.ShellView"
             xmlns="http://schemas.microsoft.com/winfx/2006/xaml/presentation"
             xmlns:x="http://schemas.microsoft.com/winfx/2006/xaml"
             xmlns:cal="http://www.caliburnproject.org">
    <StackPanel>
        <ItemsControl x:Name="Items">
            <ItemsControl.ItemTemplate>
                <DataTemplate>
                    <StackPanel Orientation="Horizontal">
                        <Button Content="Remove"
                                cal:Message.Attach="Remove($dataContext)" />
                        <TextBlock Text="{Binding Id}" />
                    </StackPanel>
                </DataTemplate>
            </ItemsControl.ItemTemplate>
        </ItemsControl>
        <Button Content="Add"
                cal:Message.Attach="Add" />
    </StackPanel>
</UserControl>
Message.Attach
The first thing to notice is that we are using a more Xaml-developer-friendly mechanism for declaring our ActionMessages. The Message.Attach property is backed by a simple parser which takes its textual input and transforms it into the full Interaction.Trigger/ActionMessage that you’ve seen previously. If you work primarily in the Xaml editor and not in the designer, you’re going to like Message.Attach. Notice that neither Message.Attach declarations specify which event should send the message. If you leave off the event, the parser will use the ConventionManager to determine the default event to use for the trigger. In the case of Button, it’s Click. You can always be explicit of coarse. Here’s what the full syntax for our Remove message would look like if we were declaring everything:
<Button Content="Remove" cal:Message.Attach="[Event Click] = [Action Remove($dataContext)]" />
Suppose we were to re-write our parameterized SayHello action with the Message.Attach syntax. It would look like this:
<Button Content="Click Me" cal:Message.Attach="[Event Click] = [Action SayHello(Name.Text)]" />
But we could also leverage some smart defaults of the parser and do it like this:
<Button Content="Click Me" cal:Message.Attach="SayHello(Name)" />
You can specify literals as parameters as well and even declare multiple actions by separating them with a semicolon:
<Button Content="Let's Talk" cal:Message.Attach="[Event MouseEnter] = [Action Talk('Hello', Name.Text)]; [Event MouseLeave] = [Action Talk('Goodbye', Name.Text)]" />
Warning
Those developers who ask me to expand this functionality into a full-blown expression parser will be taken out back and…dealt with. Message.Attach is not about cramming code into Xaml. It’s purpose is to provide a streamlined syntax for declaring when/what messages to send to the ViewModel. Please don’t abuse this.
If you haven’t already, run the application. Any doubts you had will hopefully be put to rest when you see that the message bubbling works as advertised :) Something else I would like to point out is that CM automatically performs type-conversion on parameters. So, for example, you can pump TextBox.Text into a System.Double parameter without any fear of a casting issue.
So, we’ve discussed using Interaction.Triggers with ActionMessage, including the use of Parameters with literals, element bindings3 and special values. We’ve discussed the various ways to set the action target depending on your needs/architectural style: Action.Target, Action.TargetWithoutContext, Bind.Model or View.Model. We also saw an example of the bubbling nature of ActionMessage and demoed it using the streamlined Message.Attach syntax. All along the way we’ve looked at various examples of conventions in action too. Now, there’s one final killer feature of ActionMessage we haven’t discussed yet…Coroutines. But, that will have to wait until next time.